Docker Networks
Offline Mode
- By default, Docker containers are not cut off from the network: each container joins the default
bridgenetwork, can reach other containers on it by IP (name-based DNS only works on user-defined networks), and has outbound access to the host and the internet. Ports are only reachable from outside if you publish them with-p. - To fully isolate a container, start it with
--network none: it then gets only a loopback interface and cannot communicate with other containers, the host or the internet. - You might be thinking, “why would I want to turn off networking”??? Well, usually for security reasons. You might want to remove the network connection from a container in one of these scenarios:
- You’re running 3rd party code that you don’t trust, and it shouldn’t need network access
- You’re building an e-learning site, and you’re allowing students to execute code on your machines
- You know a container has a virus that’s sending malicious requests over the internet, and you want to do an audit
Ping
-
To test the network connection between two containers, you can use the
pingcommand.docker exec -it <container1_id> ping <container2_ip><container1_id>: The ID of the first container.<container2_ip>: The IP address of the second container.
Break the Network
-
Method 1 - Create in Offline Mode
-
To create a container in offline mode, you can use the following command:
docker run -d --network none <image_name>none: No network.<image_name>: The name of the image.
-
-
Method 2 - Disconnect
-
To break the network connection of a container, you can use the following command:
docker network disconnect bridge <container_id>bridge: The name of the network.<container_id>: The ID of the container.
-
To reconnect the container to the network, you can use the following command:
docker network connect bridge <container_id>bridge: The name of the network.<container_id>: The ID of the container.
-
Load Balancer
What is a Load Balancer?
- A load balancer behaves as advertised: it balances a load of network traffic. Think of a huge website like Google.com. There’s no way that a single server (literally a single computer) could handle all of the Google searches for the entire world. Google uses load balancers to route requests to different servers.
How Does a Load Balancer Work?
A central server, called the “load balancer”, receives traffic from users (aka clients), then routes those raw requests to different back-end application servers. In the case of Google, this splits the world’s traffic across potentially many different thousands of computers.
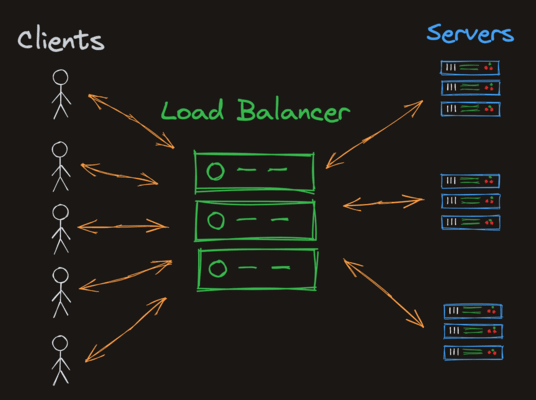
How does it “balance” the traffic?
- A good load balancer sends more traffic to servers that have unused resources (CPU and memory). The goal is to “balance the load” evenly. We don’t want any individual server to fail due to too much traffic. There are many strategies that load balancers use, but a simple strategy is the “round robin”. Requests are simply routed one after the other to different back-end servers.
Example of “Round Robin” Load Balancer
-
Request 1 → Server 1
-
Request 2 → Server 2
-
Request 3 → Server 3
-
Request 4 → Server 1
-
…
-
Issue with “Round Robin”: What if Server 1 is really slow? We don’t want to send more requests to Server 1 if it’s already overloaded. A better strategy is to send requests to the server with the fewest connections. This is called the “Least Connections” strategy.
Example of “Least Connections” Load Balancer
-
Here we have 2 servers. The load balancer keeps track of how many connections each server has. It sends the next request to the server with the fewest connections.
-
Request 1 → Server 1
-
Request 2 → Server 1
-
Request 3 → Server 2
-
Request 4 → Server 1
-
…
Scaling
- Load balancers are a key part of scaling an application. If you have a website that’s getting more and more traffic, you can add more servers to handle the load. The load balancer will automatically route traffic to the new servers.
- Load balancers can also help with redundancy. If one server fails, the load balancer can automatically route traffic to the other servers.
-
Vertical Scaling - Adding more resources to a single server.
- This is limited by the capacity of the server. You can only add so much RAM, CPU, etc.
- Can be expensive.
-
Horizontal Scaling - Adding more servers.
- This is the preferred way to scale web applications.
- Can be done with load balancers.
- Complex to set up, but more scalable.
Application Servers
- Application Servers are servers that run your application code. They are the servers that the load balancer routes traffic to.
- First, we need to start some application servers so that we have something to load balance! We’ll be using Caddy, an awesome open-source load balancer/web server. Nginx and Apache are other popular alternatives that do similar things, but Caddy is a modern version written in Go, so I think it will be cool to play with.
What will our Web Server do?
- Each application server will serve a slightly different HTML webpage. The reason they’re different is just so that we can see load balancing in action!
1. Pull the Caddy Docker Image
Caddy is a lightweight and powerful web server. Begin by pulling the Caddy image from Docker Hub:
docker pull caddyThis command downloads the latest Caddy image to your machine, making it available for running containers.
2. Create HTML Files
In your working directory, create two HTML files that will be served by different Caddy containers.
-
index1.html
<html> <body> <h1>Hello from server 1</h1> </body> </html> -
index2.html
<html>
<body>
    <h1>Hello from server 2</h1>
</body>
</html>
These simple HTML files will be served on different ports by separate Caddy containers.
3. Run Caddy Containers to Serve the HTML Files
-
Run the first Caddy container to serve
index1.htmlon port 8001:docker run -p 8001:80 -v $PWD/index1.html:/usr/share/caddy/index.html caddyThis command:
- Maps port 8001 on your host to port 80 on the container (the default HTTP port).
- Mounts the
index1.htmlfile from your current working directory ($PWD) into the container’s web root (/usr/share/caddy/index.html), so it can be served.
-
Run the second Caddy container to serve
index2.htmlon port 8002:docker run -p 8002:80 -v $PWD/index2.html:/usr/share/caddy/index.html caddySimilar to the first container, this command maps port 8002 on your host to port 80 in the container and serves
index2.html.
4. Running Containers in Detached Mode (Optional)
You can run the containers in the background using the -d flag. This allows you to close the terminal without stopping the containers.
docker run -d -p 8001:80 -v $PWD/index1.html:/usr/share/caddy/index.html caddy
docker run -d -p 8002:80 -v $PWD/index2.html:/usr/share/caddy/index.html caddy
5. Verify the Setup
Open your web browser and navigate to the following URLs:
-
For the first container:
- URL:
http://localhost:8001 - You should see:
Hello from server 1
- URL:
-
For the second container:
- URL:
http://localhost:8002 - You should see:
Hello from server 2
- URL:
This setup demonstrates how to use Docker to run multiple Caddy containers serving different HTML files on different ports. Each container runs independently, and you can access each one via its respective port.
Custom Networks
-
Docker allows us to create custom bridge networks so that our containers can communicate with each other if we want them to, but remain otherwise isolated. We’re going to build a system where the application servers are hidden within a custom network, and only our load balancer is exposed to the host.
-
Create a Custom Network
docker network create my-networkThis command creates a custom bridge network named
my-network. -
List Networks
docker network lsThis command lists all the networks on your system, including the newly created
my-network.
Example Notes: Attaching Caddy Servers to a Custom Docker Network and Testing with a Client Container
1. Create and Run Caddy Containers on a Custom Network
To manage inter-container communication, create Caddy containers on a custom Docker network called caddytest and give each container a unique name for easier identification.
-
Create the network first (otherwise
--network caddytestfails):docker network create caddytest -
Run the first Caddy container (caddy1) on port 8001:
docker run --network caddytest --name caddy1 -p 8001:80 -v $PWD/index1.html:/usr/share/caddy/index.html caddyThis command:
- Network: Connects the container to the
caddytestnetwork, enabling communication between containers. - Name: Assigns the container the name
caddy1. - Port mapping: Exposes port 8001 on your host machine.
- Volume: Mounts
index1.htmlto/usr/share/caddy/index.htmlinside the container.
- Network: Connects the container to the
-
Run the second Caddy container (caddy2) on port 8002:
docker run --network caddytest --name caddy2 -p 8002:80 -v $PWD/index2.html:/usr/share/caddy/index.html caddyThis is similar to
caddy1but servesindex2.htmland is mapped to port 8002.
2. Verify Name Resolution and Networking with Another Container
To test that the containers can communicate over the caddytest network, run an additional container and access the Caddy servers using their assigned names.
-
Start a shell session in a
getting-startedcontainer attached to thecaddytestnetwork:docker run -it --network caddytest docker/getting-started /bin/shThis opens an interactive shell session inside a new container running on the same network (
caddytest), allowing you to test communication between containers. -
Test communication with
caddy1usingcurl:curl caddy1This command sends an HTTP request to
caddy1, which should return the HTML content fromindex1.html. -
Test communication with
caddy2usingcurl:curl caddy2Similarly, this should return the HTML content from
index2.html.
3. Exiting the Shell Session and Restarting Named Containers
Once you’ve successfully received the expected HTML responses, you can exit the shell session:
exitTo restart the Caddy containers, you don’t need to run the entire docker run command again. Simply use the following commands to restart the named containers:
-
Start
caddy1:docker start caddy1 -
Start
caddy2:docker start caddy2
This will start the containers with their previous configurations, including the custom network and name assignments.
Summary
- Created and ran two Caddy containers (
caddy1andcaddy2) attached to thecaddytestnetwork. - Verified name resolution between containers by running a client container and using
curlto communicate with the Caddy servers by name. - Restarted the named containers with
docker start caddy1anddocker start caddy2commands for convenience.
Configurign Load Balancer
- We’ve confirmed that we have 2 application servers (Caddy) working properly on a custom bridge network. Let’s create a load balancer that balances network requests between the two! We’ll use a round-robin balancing strategy, so each request should route back and forth between the servers.
Caddyfile for the load balancer
-
Caddy works great as a file server, which is what our little HTML servers are, but it also works great as a load balancer! To use Caddy as a load balancer we need to create a custom Caddyfile to tell Caddy how we want it to balance traffic.
-
Create a new file in your local directory called Caddyfile:
localhost:80

reverse_proxy caddy1:80 caddy2:80 {
lb_policy       round_robin
}
This tells Caddy to run on localhost:80, and to round robin any incoming traffic to caddy1:80 and caddy2:80. Remember, this only works because we’re going to run the loadbalancer within the same network, so caddy1 and caddy2 will automatically resolve to our application server’s containers.
Running the Load Balancer
-
Run the Caddy load balancer:
docker run --network caddytest -v $PWD/Caddyfile:/etc/caddy/Caddyfile -p 8080:80 caddyThis command:
- Network: Connects the load balancer to the
caddytestnetwork. - Volume: Mounts the local
Caddyfileto the container’s/etc/caddy/Caddyfile. - Port mapping: Maps host port 8080 to the container’s port 80 (
-p host:container).
- Network: Connects the load balancer to the
-
If you open your browser and navigate to
http://localhost:8080, you should see the load balancer in action, alternating between the two HTML pages served bycaddy1andcaddy2.