Docker CLI is a command-line tool that allows you to interact with the Docker daemon.
To use the Docker CLI, you need to have Docker installed on your system.
To view the list of available Docker CLI commands, you can run docker --help or docker -h.
Docker prebuild sample container
You can run a prebuilt sample container using the following command:
docker run -d -p 80:80 docker/getting-started:latest
-d: Run the container in detached mode.
-p 80:80: Map port 80 of the host machine to port 80 of the container.
docker/getting-started:latest: The name of the image to run.
To view the running containers, you can run docker ps.
To stop a running container, you can run docker stop <container_id>. Issuing the ‘SIGTERM’ signal to the main process of the container.
To kill a running container, you can run docker kill <container_id>. Issuing the ‘SIGKILL’ signal to the main process of the container.
To remove a container, you can run docker rm <container_id>.
Docker Images VS Containers
Docker Images: A Docker image is a read-only template that contains a set of instructions for creating a container. It is a lightweight, standalone, executable package that includes everything needed to run a piece of software, including the code, a runtime, libraries, environment variables, and configuration files.
Docker Containers: A Docker container is a runnable instance(read and write) of a Docker image. It is a lightweight, standalone, executable package that includes everything needed to run a piece of software, including the code, a runtime, libraries, environment variables, and configuration files.
Container is an instance of an image.
Image defines the environment inside the container.
Docker Commands Execution
List the running containers:
docker ps
Run a container in detached mode:
docker run -d <image_name>
To execute a command inside a running container, you can use the docker exec command:
docker exec -it <container_id> <command>
-it: Interactive mode.
<container_id>: The ID of the container.
<command>: The command to execute.
Example:
docker exec <container_id> netstat -ltnp
‘netstat -ltnp’ command is used to display all listening ports.
Active Internet connections (only servers)Proto Recv-Q Send-Q Local Address Foreign Address State PID/Program nametcp 0 0 0.0.0.0:80 0.0.0.0:* LISTEN 1/nginx: master protcp 0 0 :::80 :::* LISTEN 1/nginx: master pro
To open shell session inside a running container, you can use the docker exec command:
docker exec -it <container_id> /bin/sh
Docker Logs
To view the logs of a container, you can use the docker logs command:
docker logs <container_id>
Multiple Containers
To run multiple containers, you can use the docker run command multiple times with different images.
Remember, Docker is very lightweight. It’s normal to run many containers on a single host machine.
Each container is isolated from the others, and they can communicate with each other if needed.
Each container should be on different ports.
Example:
docker run -d -p 80:80 docker/getting-started:latestdocker run -d -p 81:80 docker/getting-started:latestdocker run -d -p 8080:80 docker/getting-started:latest
Docker Stats
To view all containers stats, you can use the docker stats command:
docker stats
To view the resource usage of a container, you can use the docker stats command:
It is a platform that allows you to develop, ship, and run applications in a containerized environment.
It is a tool designed to make it easier to create, deploy, and run applications by using containers.
Containers allow a developer to package up an application with all of the parts it needs, such as libraries and other dependencies, and ship it all out as one package.
It is a tool that is designed to benefit both developers and system administrators, making it a part of many DevOps (developers + operations) toolchains.
It is not a programming language, framework, or library.
Different ways to use Docker
Docker Desktop: It is an easy-to-install application for your Mac or Windows environment that enables you to build and share containerized applications and microservices.
Docker CLI: It is a command-line tool that allows you to interact with the Docker daemon.
What is a Container?
A container is a standard unit of software that packages up code and all its dependencies so the application runs quickly and reliably from one computing environment to another.
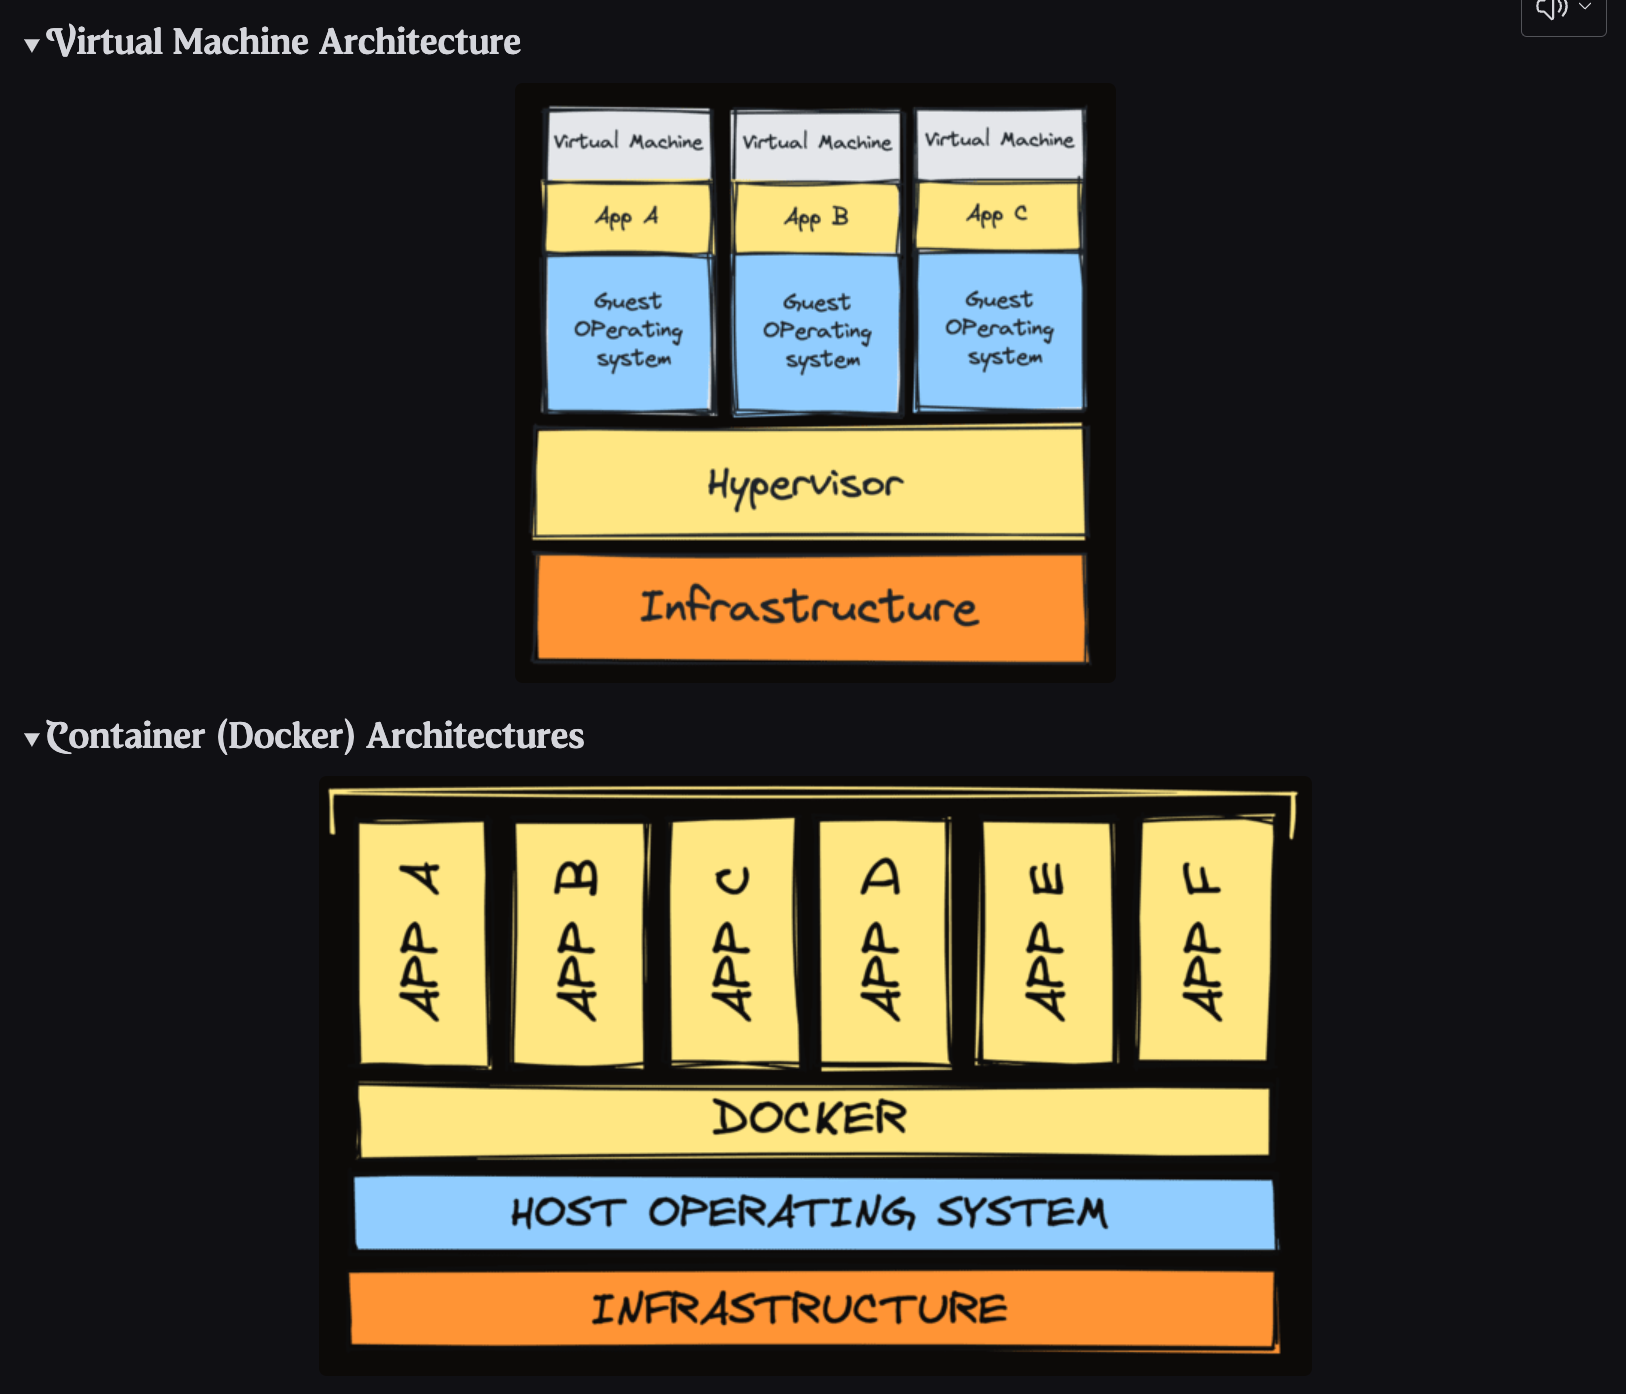
We’ve had virtual machines for a long time. The trouble with virtual machines is that they are very heavy on resources. Booting one up often takes longer than booting up your physical machine.
A container gives us 95% of the benefits that virtual machines offer (at least as back-end developers), but are super lightweight. Containers boot up in seconds, while virtual machines can take minutes.
Virtual machines virtualize hardware, they emulate what a physical computer does at a very low level. Containers virtualize at the operating system level. Isolation between containers that are running on the same machine is still really good. For the most part, it appears to each container as if it has its own operating and filesystem. In reality, a lot of resources are being shared, but they’re being shared securely through namespaces.
Docker Hub
Docker Hub: It is a cloud-based registry service that allows you to link to code repositories, build your images, test them, store manually pushed images, and link to Docker Cloud so you can deploy images to your hosts.
Can also use AWS-ECR or GCP-Container Registery.
Docker Architecture
Docker Daemon: It is a background service that runs on the host operating system. The Docker daemon is responsible for managing Docker objects such as images, containers, networks, and volumes.
Docker Containers: It is a runnable instance of a Docker image. You can create, start, stop, move, or delete a container using the Docker API or CLI.
Docker can build images automatically by reading the instructions from a Dockerfile. A Dockerfile is a text document that contains all the commands a user could call on the command line to assemble an image.
Dockerfiles are amazing because they allow us to define the environment our applications are meant to use in code. We can even commit the Dockerfiles to Git alongside our source code.
DevOps
Dockerfiles are a key component of DevOps. They allow developers to define the environment their applications run in, and they allow operations to define the environment that applications run in. This is a key part of the DevOps movement, where developers and operations work together to deliver better software faster.
GitOps / Infrastructure as Code(IaC)
Dockerfiles are a key part of GitOps and Infrastructure as Code (IaC). They allow us to define the environment our applications run in as code. This means we can commit our Dockerfiles to Git alongside our source code. This is a key part of GitOps and IaC, where we define our infrastructure as code and commit it to Git.
Creating a Dockerfile
The Dockerfile is a simple text file that contains a list of commands that the Docker client calls while creating an image. It’s a simple way to automate the image creation process. The best part is that the commands you write in a Dockerfile are almost identical to their equivalent Linux commands.
Example Dockerfile:
# This is a comment# Use a lightweight debian os# as the base imageFROM debian:stable-slim# execute the 'echo "hello world"'# command when the container runsCMD ["echo", "hello world"]
Building an Image
To build an image from a Dockerfile, use the docker build command. The docker build command builds an image from a Dockerfile and a context. A context is the set of files located in the specified PATH or URL. The build process can refer to any of the files in the context. For example, your build can use a COPY instruction to reference a file in the context.
docker build -t my-image .
The -t flag lets you tag your image so it’s easier to find later using the docker images command.
The . at the end of the docker build command is the build context (the files COPY can see). Docker looks for the Dockerfile inside the context by default; -f path/to/Dockerfile overrides that.
The docker build command will build the image and tag it with the name my-image.
Running a Container
To run a container from an image, use the docker run command. The docker run command creates a container from an image and runs it using the specified command.
docker run my-image
The docker run command will run the container and execute the command specified in the Dockerfile.
In this case, the command is echo "hello world", so the container will run and output hello world.
The first step to running your Go server in Docker is to create a Dockerfile in the root directory of your project.
Base Image: Start with a lightweight Debian Linux image for the container environment:
FROM debian:stable-slim
2. Add the Go Server Executable
The next step is to copy the Go server executable into the container.
COPY Command: This copies the Go binary from your host machine into the Docker image:
COPY goserver /bin/goserver
goserver: Replace this with the name of your actual Go binary if it’s different.
/bin/goserver: This is where the Go binary will be placed inside the Docker container.
Note: You can use COPY instead of ADD because you don’t need the extra functionality that ADD offers (e.g., extracting archives).
3. Run the Go Server
To ensure the Go server starts when the container is run, add a CMD instruction at the end of your Dockerfile:
CMD Command: This starts the Go server process inside the container:
CMD ["/bin/goserver"]
This tells Docker to execute /bin/goserver when the container is started.
4. Build the Docker Image
After setting up your Dockerfile, you need to build the Docker image.
Build the image:
docker build . -t goserver:latest
.: Specifies the current directory as the build context.
-t goserver:latest: Tags the image as goserver:latest.
5. Run the Docker Container
Run the container while forwarding the necessary ports to access the server from your host system:
Run the container:
docker run -p 8080:8080 goserver
-p 8080:8080: Maps port 8080 on the host to port 8080 inside the container, allowing access to the Go server via localhost:8080.
6. Troubleshooting: Exec Format Error
If you encounter an exec format error, this typically means the binary was compiled for a different operating system or architecture (e.g., MacOS or Windows, but the container runs on Linux).
Solution: Recompile the Go server binary for Linux before building the Docker image:
GOOS=linux GOARCH=amd64 go build
GOOS=linux: Ensures the binary is built for a Linux environment.
GOARCH=amd64: Specifies the architecture (64-bit).
After recompiling, rebuild the Docker image and run the container again.
Summary
Create Dockerfile with a lightweight base image (Debian).
Copy the Go binary into the container using the COPY command.
Run the server on container startup using the CMD command.
Build and run the Docker image, ensuring to map the correct ports.
Troubleshoot exec format errors by compiling the Go binary for Linux.
Configuring and Dockerizing the Go Server with Environment Variables
1. Why Dockerize a Simple Service?
Dockerizing a simple service offers several benefits:
Cross-platform compatibility: Anyone with Docker can run your image, regardless of their OS.
Cloud deployment: The image can be deployed on cloud services that support Docker containers (e.g., AWS, Google Cloud, Kubernetes).
Encapsulation: If the service has dependencies (e.g., a Python interpreter), Docker can bundle these dependencies, eliminating the need for users to configure them.
2. Configuring the Server with Environment Variables
To make your Go server more configurable, it’s important to use environment variables. The server should bind to a port specified through an environment variable, which provides flexibility in different environments (development, testing, production).
Using os.Getenv() in Go: Modify your Go server to bind to the port specified by an environment variable (PORT):
package mainimport ( "fmt" "net/http" "os")func main() { // Get the port from the environment variable port := os.Getenv("PORT") if port == "" { port = "8080" // Fallback to default port if not set } http.HandleFunc("/", func(w http.ResponseWriter, r *http.Request) { fmt.Fprintf(w, "Hello from Go server!") }) fmt.Printf("Server is running on port %s\n", port) http.ListenAndServe(":" + port, nil)}
3. Test the Server Locally
Before Dockerizing, you should test the environment variable configuration:
Set the environment variable:
export PORT=8080
Verify the variable is set:
echo $PORT
Run the Go server: It should bind to the port specified by the PORT environment variable.
4. Update the Dockerfile to Support the PORT Variable
To make the Docker image more configurable, you can set a default PORT environment variable within the Dockerfile:
Update the Dockerfile:
FROM debian:stable-slim# Copy the Go server binary to the imageCOPY goserver /bin/goserver# Set the PORT environment variableENV PORT=8080# Run the Go serverCMD ["/bin/goserver"]
ENV PORT=8080: Sets the default port to 8080. ENV values are baked into the image and exist at runtime in the container, which is why you can override this when running it (-e PORT=9000). The build-time-only variable is ARG.
Build the Docker image:
docker build . -t goserver:latest
5. Run the Docker Container
When running the Docker container, you can specify a different port if needed using the -e flag:
Run the container:
docker run -p 8080:8080 goserver
To override the PORT environment variable:
docker run -e PORT=9000 -p 9000:9000 goserver
6. Why Use Environment Variables?
Flexibility: Environment variables allow you to change configuration (e.g., ports, database URLs) without modifying your code.
Separation of concerns: You can manage local development and production configurations easily by swapping environment variables.
Summary
Modify your Go server to read the port from the PORT environment variable.
Test the server locally by setting the PORT variable in your shell.
Update the Dockerfile to include the ENV PORT=8080 directive.
Build and run the Docker container, using environment variables to configure ports flexibly.
Simple Example: Dockerizing a Python Script
Let’s go through a simple example where we’ll Dockerize a basic Python script that prints “Hello, World!” and counts the number of characters in a string.
1. Create the Project Directory
Set up the project folder:
Create a folder called simple-python-app.
Inside this folder, create a Python file called main.py.
This simple Python program prints a message and counts how many characters are in it.
2. Create the Dockerfile
In the root of your simple-python-app folder, create a file called Dockerfile. This file tells Docker how to package your Python application.
Dockerfile:
# Use the official Python image from Docker HubFROM python:3.10-slim# Set the working directory inside the containerWORKDIR /app# Copy the current directory contents into the container at /appCOPY . /app# Command to run the Python script when the container startsCMD ["python", "main.py"]
3. Build the Docker Image
Now, you need to build your Docker image using the Dockerfile you just created.
Open a terminal or command prompt.
Navigate to the simple-python-app directory where your Dockerfile is located.
Run the following command to build the Docker image:
docker build -t simple-python-app .
This will build the Docker image and tag it as simple-python-app.
4. Run the Docker Container
After building the image, you can run the container with this command:
docker run simple-python-app
You should see the following output:
Message: Hello, World!
Number of characters: 13
Summary
Project Directory: Created a folder containing a simple Python script (main.py) and a Dockerfile.
Dockerfile: Used to define the environment for running the Python app in a Docker container.
Build & Run: Built the Docker image and ran the container, which executed the Python script and printed the results.
Notes on Dockerizing Python for the Bookbot Example
Steps to Dockerize a Python Application
Base Image:
Debian Slim is chosen as the base image because it’s lightweight and reliable for building custom environments.
This base image doesn’t come with Python installed, so we need to install it manually.
Copy Application Code:
The COPY command is used to add the Python script (main.py) and its dependencies (e.g., text files in the books folder) into the image.
The COPY command ensures that the application code and necessary data are part of the image, making it portable.
Updating the System:
apt-get update and apt-get upgrade -y update the package lists and upgrade installed packages. Keep update in the sameRUN as install: as a separate layer it gets cached and the package lists go stale.
The slow RUN steps come before the COPY of our code. Every code change invalidates the cache from the COPY onwards, so copying first would rebuild Python every time.
Install Build Tools:
Installing the necessary build tools like build-essential, zlib1g-dev, libssl-dev, etc., is required to compile Python from source.
Download and Install Python:
Download Python Source Code: wget https://www.python.org/ftp/python/3.10.8/Python-3.10.8.tgz fetches the Python source code from the official Python repository.
Extract Python: tar -xf Python-3.10.*.tgz extracts the downloaded file.
Build and Install Python: This part compiles Python and installs it using make altinstall. altinstall is used instead of install to prevent overwriting system Python versions.
Run the Python Script:
The CMD command at the end runs the Python script using the newly installed Python version. It specifies python3.10, which was built and installed in the previous steps.
Full Dockerfile Breakdown
# Build from a slim Debian/Linux imageFROM debian:stable-slim# Update apt (get the latest package lists) and install build tooling + dependencies# required for building Python, in ONE layer so the package lists are never staleRUN apt-get update && apt-get upgrade -y && \ apt-get install -y build-essential zlib1g-dev libncurses5-dev libgdbm-dev \ libnss3-dev libssl-dev libreadline-dev libffi-dev libsqlite3-dev wget libbz2-dev && \ rm -rf /var/lib/apt/lists/*# Download Python interpreter code and unpack itRUN wget https://www.python.org/ftp/python/3.10.8/Python-3.10.8.tgzRUN tar -xf Python-3.10.*.tgz# Build the Python interpreter and install itRUN cd Python-3.10.8 && ./configure --enable-optimizations && make && make altinstall# Copy our data dependencies and code LAST, so a code change doesn't# invalidate the cached (slow) Python build aboveCOPY books/ books/COPY main.py main.py# Run the Python scriptCMD ["python3.10", "main.py"]
Build and Run the Docker Image
Build the Docker Image:
docker build -t bookbot .
The -t bookbot flag tags the image with the name “bookbot.”
The . is the build context (current directory); the Dockerfile is looked up there by default (-f overrides it).
Run the Docker Container:
docker run bookbot
This command starts a container from the bookbot image and runs the Python script inside the container.
Key Points
Docker provides an isolated environment, allowing you to bundle your Python application along with its runtime (Python 3.10 in this case) and dependencies.
Using a lightweight base image like Debian slim helps keep the container size small, but you still need to manually install the Python runtime.
The CMD instruction ensures that the Python script runs automatically when the container starts.
The build tools stay in the final image. For a smaller image, use a multi-stage build or just start FROM python:3.10-slim.
By default, Docker containers are not cut off from the network: each container joins the default bridge network, can reach other containers on it by IP (name-based DNS only works on user-defined networks), and has outbound access to the host and the internet. Ports are only reachable from outside if you publish them with -p.
To fully isolate a container, start it with --network none: it then gets only a loopback interface and cannot communicate with other containers, the host or the internet.
You might be thinking, “why would I want to turn off networking”??? Well, usually for security reasons. You might want to remove the network connection from a container in one of these scenarios:
You’re running 3rd party code that you don’t trust, and it shouldn’t need network access
You’re building an e-learning site, and you’re allowing students to execute code on your machines
You know a container has a virus that’s sending malicious requests over the internet, and you want to do an audit
Ping
To test the network connection between two containers, you can use the ping command.
<container2_ip>: The IP address of the second container.
Break the Network
Method 1 - Create in Offline Mode
To create a container in offline mode, you can use the following command:
docker run -d --network none <image_name>
none: No network.
<image_name>: The name of the image.
Method 2 - Disconnect
To break the network connection of a container, you can use the following command:
docker network disconnect bridge <container_id>
bridge: The name of the network.
<container_id>: The ID of the container.
To reconnect the container to the network, you can use the following command:
docker network connect bridge <container_id>
bridge: The name of the network.
<container_id>: The ID of the container.
Load Balancer
What is a Load Balancer?
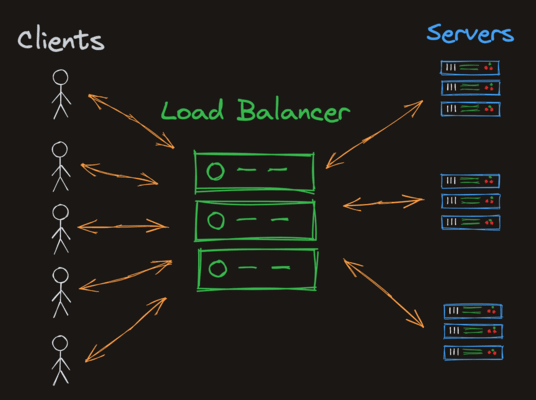
A load balancer behaves as advertised: it balances a load of network traffic. Think of a huge website like Google.com. There’s no way that a single server (literally a single computer) could handle all of the Google searches for the entire world. Google uses load balancers to route requests to different servers.
How Does a Load Balancer Work?
A central server, called the “load balancer”, receives traffic from users (aka clients), then routes those raw requests to different back-end application servers. In the case of Google, this splits the world’s traffic across potentially many different thousands of computers.
How does it “balance” the traffic?
A good load balancer sends more traffic to servers that have unused resources (CPU and memory). The goal is to “balance the load” evenly. We don’t want any individual server to fail due to too much traffic. There are many strategies that load balancers use, but a simple strategy is the “round robin”. Requests are simply routed one after the other to different back-end servers.
Example of “Round Robin” Load Balancer
Request 1 → Server 1
Request 2 → Server 2
Request 3 → Server 3
Request 4 → Server 1
…
Issue with “Round Robin”: What if Server 1 is really slow? We don’t want to send more requests to Server 1 if it’s already overloaded. A better strategy is to send requests to the server with the fewest connections. This is called the “Least Connections” strategy.
Example of “Least Connections” Load Balancer
Here we have 2 servers. The load balancer keeps track of how many connections each server has. It sends the next request to the server with the fewest connections.
Request 1 → Server 1
Request 2 → Server 1
Request 3 → Server 2
Request 4 → Server 1
…
Scaling
Load balancers are a key part of scaling an application. If you have a website that’s getting more and more traffic, you can add more servers to handle the load. The load balancer will automatically route traffic to the new servers.
Load balancers can also help with redundancy. If one server fails, the load balancer can automatically route traffic to the other servers.
Vertical Scaling - Adding more resources to a single server.
This is limited by the capacity of the server. You can only add so much RAM, CPU, etc.
Can be expensive.
Horizontal Scaling - Adding more servers.
This is the preferred way to scale web applications.
Can be done with load balancers.
Complex to set up, but more scalable.
Application Servers
Application Servers are servers that run your application code. They are the servers that the load balancer routes traffic to.
First, we need to start some application servers so that we have something to load balance! We’ll be using Caddy, an awesome open-source load balancer/web server. Nginx and Apache are other popular alternatives that do similar things, but Caddy is a modern version written in Go, so I think it will be cool to play with.
What will our Web Server do?
Each application server will serve a slightly different HTML webpage. The reason they’re different is just so that we can see load balancing in action!
1. Pull the Caddy Docker Image
Caddy is a lightweight and powerful web server. Begin by pulling the Caddy image from Docker Hub:
docker pull caddy
This command downloads the latest Caddy image to your machine, making it available for running containers.
2. Create HTML Files
In your working directory, create two HTML files that will be served by different Caddy containers.
index1.html
<html><body> <h1>Hello from server 1</h1></body></html>
index2.html
<html><body> <h1>Hello from server 2</h1></body></html>
These simple HTML files will be served on different ports by separate Caddy containers.
3. Run Caddy Containers to Serve the HTML Files
Run the first Caddy container to serve index1.html on port 8001:
docker run -p 8001:80 -v $PWD/index1.html:/usr/share/caddy/index.html caddy
This command:
Maps port 8001 on your host to port 80 on the container (the default HTTP port).
Mounts the index1.html file from your current working directory ($PWD) into the container’s web root (/usr/share/caddy/index.html), so it can be served.
Run the second Caddy container to serve index2.html on port 8002:
docker run -p 8002:80 -v $PWD/index2.html:/usr/share/caddy/index.html caddy
Similar to the first container, this command maps port 8002 on your host to port 80 in the container and serves index2.html.
4. Running Containers in Detached Mode (Optional)
You can run the containers in the background using the -d flag. This allows you to close the terminal without stopping the containers.
docker run -d -p 8001:80 -v $PWD/index1.html:/usr/share/caddy/index.html caddydocker run -d -p 8002:80 -v $PWD/index2.html:/usr/share/caddy/index.html caddy
5. Verify the Setup
Open your web browser and navigate to the following URLs:
For the first container:
URL: http://localhost:8001
You should see: Hello from server 1
For the second container:
URL: http://localhost:8002
You should see: Hello from server 2
This setup demonstrates how to use Docker to run multiple Caddy containers serving different HTML files on different ports. Each container runs independently, and you can access each one via its respective port.
Custom Networks
Docker allows us to create custom bridge networks so that our containers can communicate with each other if we want them to, but remain otherwise isolated. We’re going to build a system where the application servers are hidden within a custom network, and only our load balancer is exposed to the host.
Create a Custom Network
docker network create my-network
This command creates a custom bridge network named my-network.
List Networks
docker network ls
This command lists all the networks on your system, including the newly created my-network.
Example Notes: Attaching Caddy Servers to a Custom Docker Network and Testing with a Client Container
1. Create and Run Caddy Containers on a Custom Network
To manage inter-container communication, create Caddy containers on a custom Docker network called caddytest and give each container a unique name for easier identification.
Create the network first (otherwise --network caddytest fails):
docker network create caddytest
Run the first Caddy container (caddy1) on port 8001:
This is similar to caddy1 but serves index2.html and is mapped to port 8002.
2. Verify Name Resolution and Networking with Another Container
To test that the containers can communicate over the caddytest network, run an additional container and access the Caddy servers using their assigned names.
Start a shell session in a getting-started container attached to the caddytest network:
docker run -it --network caddytest docker/getting-started /bin/sh
This opens an interactive shell session inside a new container running on the same network (caddytest), allowing you to test communication between containers.
Test communication with caddy1 using curl:
curl caddy1
This command sends an HTTP request to caddy1, which should return the HTML content from index1.html.
Test communication with caddy2 using curl:
curl caddy2
Similarly, this should return the HTML content from index2.html.
3. Exiting the Shell Session and Restarting Named Containers
Once you’ve successfully received the expected HTML responses, you can exit the shell session:
exit
To restart the Caddy containers, you don’t need to run the entire docker run command again. Simply use the following commands to restart the named containers:
Start caddy1:
docker start caddy1
Start caddy2:
docker start caddy2
This will start the containers with their previous configurations, including the custom network and name assignments.
Summary
Created and ran two Caddy containers (caddy1 and caddy2) attached to the caddytest network.
Verified name resolution between containers by running a client container and using curl to communicate with the Caddy servers by name.
Restarted the named containers with docker start caddy1 and docker start caddy2 commands for convenience.
Configurign Load Balancer
We’ve confirmed that we have 2 application servers (Caddy) working properly on a custom bridge network. Let’s create a load balancer that balances network requests between the two! We’ll use a round-robin balancing strategy, so each request should route back and forth between the servers.
Caddyfile for the load balancer
Caddy works great as a file server, which is what our little HTML servers are, but it also works great as a load balancer! To use Caddy as a load balancer we need to create a custom Caddyfile to tell Caddy how we want it to balance traffic.
Create a new file in your local directory called Caddyfile:
This tells Caddy to run on localhost:80, and to round robin any incoming traffic to caddy1:80 and caddy2:80. Remember, this only works because we’re going to run the loadbalancer within the same network, so caddy1 and caddy2 will automatically resolve to our application server’s containers.
Running the Load Balancer
Run the Caddy load balancer:
docker run --network caddytest -v $PWD/Caddyfile:/etc/caddy/Caddyfile -p 8080:80 caddy
This command:
Network: Connects the load balancer to the caddytest network.
Volume: Mounts the local Caddyfile to the container’s /etc/caddy/Caddyfile.
Port mapping: Maps host port 8080 to the container’s port 80 (-p host:container).
If you open your browser and navigate to http://localhost:8080, you should see the load balancer in action, alternating between the two HTML pages served by caddy1 and caddy2.
Stateless: The application does not store any data on the server-side. It is a design pattern that is used to make applications scalable and easy to maintain.
Stateful: The application stores data on the server-side. It is a design pattern that is used to make applications more complex and harder to maintain.
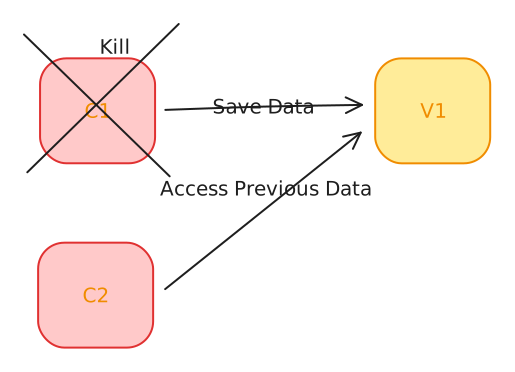
Many docker containers are “stateless”, or at least stateless in the persistent sense. That is, when you create a new container from the same image, it won’t store any information from before. When you remove the docker/getting-started container and run a new one from the image, for example, you’re starting from scratch. (A stop/start or restart of the same container keeps its writable layer; the data is lost on docker rm.)
Docker Volumes
Volumes: Volumes are the preferred mechanism for persisting data generated by and used by Docker containers. While bind mounts are dependent on the directory structure of the host machine, volumes are completely managed by Docker.
Reference
Image = Game Disk
Container = Game
Volume = Save Game/Memory Card
Docker Volume Commands
To create a volume, you can use the following command:
docker volume create <volume_name>
To list all the volumes, you can use the following command:
docker volume ls
To inspect a volume, you can use the following command:
docker volume inspect <volume_name>
Example - Ghost CMS
To run a Ghost CMS container with a volume, you can use the following command:
-e NODE_ENV=development: Set the environment variable NODE_ENV to development.
-e url=http://localhost:3001: Set the environment variable url to http://localhost:3001.
-p 3001:2368: Map port 3001 of the host machine to port 2368 of the container.
-v ghost-vol:/var/lib/ghost/content: Create a volume named ghost-vol and mount it to the /var/lib/ghost/content directory inside the container.
Create a new post in Ghost CMS, then remove the container and run a new one with the same volume. The post should still be available (it lives in ghost-vol, not in the container’s writable layer).:w
Docker Hub is the official cloud service for storing and sharing Docker images. We call these kinds of services “registries”. Other popular image registries include:
AWS Elastic Container Registry (ECR)
Google Container Registry (GCR)
Azure Container Registry (ACR)
GitHub Container Registry (GHCR)
Harbor
Steps to Publish a Docker Image to Docker Hub
Rebuild the Go Web Server:
Ensure your Go server is compiled for the correct OS and architecture using the following command:
GOOS=linux GOARCH=amd64 go build
Rebuild the Docker Image:
Use the following command to build the Docker image, replacing USERNAME with your Docker Hub username:
docker build . -t USERNAME/goserver
This command builds the image and tags it with the name USERNAME/goserver to match your Docker Hub repository namespace.
Test the Docker Image:
Before pushing to Docker Hub, test the image locally:
docker run -p 8080:8080 USERNAME/goserver
Make sure it runs correctly by accessing it at http://localhost:8080.
Login to Docker Hub:
If you are not logged in yet, authenticate yourself with Docker Hub:
docker login
Push the Docker Image to Docker Hub:
Push the image to your Docker Hub repository:
docker push USERNAME/goserver
Verify the Image:
Go to your Docker Hub account and check the “Repositories” section to verify that your new image goserver has been successfully uploaded.
Key Points
Namespace: The image must be tagged with your Docker Hub username to push it to your account.
Testing: Always test your image locally before pushing it to Docker Hub.
Image Accessibility: Once pushed, anyone with Docker can pull and run your image using docker pull USERNAME/goserver.
Deleting and Pulling a Docker Image
Remove Local Docker Image:
Use the following command to delete your local copy of the Docker image:
docker image rm USERNAME/goserver
This will remove the image USERNAME/goserver from your local machine.
Pull the Image from Docker Hub:
To pull the image back from Docker Hub, use the command:
docker pull USERNAME/goserver
This fetches the image goserver from your Docker Hub repository.
Run the Image:
After pulling it, run the image again to make sure it works correctly:
docker run -p 8080:8080 USERNAME/goserver
Run Tests:
Make sure to run any tests you have against the image to confirm it hasn’t been modified. Ensure that the content being served (e.g., HTML body) is the same as before.
Key Points
Safety in the Cloud: Docker Hub allows you to store your images remotely, making it easy to retrieve them from any machine or after accidental deletions.
Consistency: The image pulled from Docker Hub should match the original, ensuring the application behaves identically during testing.
Tag and Push a Specific Version
To tag a specific version of your image, use the following command:
docker tag USERNAME/goserver USERNAME/goserver:v1.0
docker build . -t USERNAME/goserver:v1.0
This tags the image USERNAME/goserver with version v1.0.
To push the tagged version to Docker Hub, use the command:
docker push USERNAME/goserver:v1.0
Tagging Docker Images with “Latest”
Understanding the “Latest” Tag:
The latest tag in Docker is simply the default tag used when no other tag is specified. It doesn’t necessarily mean the “most recent” version of the image, which can sometimes lead to confusion.
You can explicitly tag images with version numbers to avoid ambiguity and maintain proper version control.
Semantic Versioning:
A common practice is to use semantic versioning (e.g., 1.0.0, 2.1.0) to tag Docker images. This allows you to track different versions over time.
Despite using semantic versions, it’s common to also push an image to the latest tag so that it always points to the most up-to-date version.
Building and Tagging for Multiple Versions:
You can tag an image with both a specific version and the latest tag simultaneously during the build process:
This ensures that version 0.0.0 and latest both refer to the same image, allowing flexibility for users who either want a specific version or the most current image.
Pushing Multiple Tags to Docker Hub:
After building, you can push all the tags of the image at once using the --all-tags option:
docker push username/imagename --all-tags
Conclusion:
It’s best practice to tag all your images with version numbers and to reserve the latest tag for the most recent stable release.
This makes it easier to manage and pull specific versions while also ensuring users can always access the most recent version via the latest tag.
The Bigger Picture: Docker in the Software Development Lifecycle
Overview of the Deployment Process:
Code Development: Developers write and test new code.
Version Control: Code is committed to a version control system like Git.
Branching: Developers create a new branch on platforms like GitHub for their changes.
Pull Requests: After writing the code, developers open a pull request (PR) for review.
Peer Review: Teammates review the PR, provide feedback, and approve it if everything looks good.
Merging: The approved PR is merged into the main branch, integrating the new code.
Automated Build Process: Upon merging, an automated script (e.g., GitHub Actions) is triggered to handle the next steps:
Code Compilation: If the code is in a compiled language, the script compiles it.
Docker Image Creation: A new Docker image is built using the latest code.
Image Pushing: The new image is pushed to a container registry (e.g., Docker Hub).
Deployment to Production:
Update Notification: The server running containers (e.g., a Kubernetes cluster) is notified of the new version.
Image Pulling: The Kubernetes cluster pulls the latest Docker image.
Container Management: The cluster manages the deployment by shutting down old containers and spinning up new ones with the latest image.
Variability in Processes:
While the outlined process is common in modern, cloud-native companies, variations exist across different organizations.
Some organizations might use:
Different Version Control Systems: Such as GitLab instead of GitHub.
Alternative Container Registries: Like Amazon Elastic Container Registry (ECR) instead of Docker Hub.
Different Container Orchestration Tools: Such as Docker Swarm or other managed services instead of Kubernetes.
Importance of Docker in the Process:
Consistency: Docker provides a consistent environment across development, testing, and production, reducing “it works on my machine” issues.
Scalability: Containers can be easily scaled up or down based on demand, which is essential in cloud environments.
Isolation: Each application runs in its container, isolating it from others, which enhances security and stability.
Conclusion:
Understanding how Docker fits into the software development lifecycle is crucial for modern developers, particularly in DevOps environments.
Being adaptable to various tools and processes is key, as each organization may have its unique workflows while leveraging the power of containers.